

How To Install A Load Bearing Wall Beam
How to Install a Load-Begetting Beam
Replace a load bearing wall with a microlam beam to create a bigger room.
![]() Time
Time
Multiple Days
![]() Complication
Complication
Intermediate
![]() Cost
Cost
$101–250
Introduction
Open up upwardly cramped rooms by replacing a wall with a load-bearing beam. Create an open kitchen/dining area, a larger living room or a huge master sleeping accommodation using bones framing techniques and standard materials.
Tools Required
Materials Required
- 16d framing nails
- 2 x 4s for walls and header material
- 8d framing nails
- Structure adhesive
- Engineered beams (LVL or Gluelam)
- Joist hanger nails
- Joist hangers
The best way to make small or cramped rooms larger is to remove a wall between adjoining rooms. When you supersede a load-bearing wall with a load-bearing beam, you create a larger, more useful floor surface area and give your home a feeling of spaciousness.
In this story, nosotros'll prove you how to remove nearly any wall and tell you how to add a structural beam if it's needed. It may be scary to recollect about tearing walls out of your firm, but don't be intimidated. You lot can do it if you've done any basic carpentry work like framing in a wall or building a shed or deck. In fact, removing the wall and replacing it with a beam volition merely take a half-twenty-four hour period or less.

Projection step-past-step (18)
Step 1
Remove the Drywall
- Close off the circuit at the primary panel.
- Remove the baseboards on both sides of the wall and any electric comprehend plates.
- Slice through the tape at inside corners at the ceiling, and at any bordering walls.
- Annotation: If there aren't corners nearby, brand a vertical slit only beyond the wall.
- Tear off the drywall from both sides of the wall.
- Pro tip: Have off one side beginning by driving a hammer claw through the drywall and simply pulling a chunk free. The first side will come off in small pieces. Loosen the drywall from the other side by rapping on the behind near the studs to free information technology from the screws. That way you tin take off big pieces and minimize the cleanup.

Wait: Is Information technology a Load-Bearing Wall?
To tell if a wall is load-begetting, outset bank check the joist direction with a stud finder. A load-bearing wall almost always has ceiling or floor framing running perpendicular to it. If yous're unsure, inquire a edifice contractor or your local building inspector for advice. If it's a load-bearing wall, the inspector may aid size the axle or recommend that you have a structural engineer or builder size it. The inspector volition check the size, outcome a allow and check your work when yous're finished framing (earlier you first whatever drywall or stop work). Sometimes a total-service lumberyard will size the axle and sell information technology to y'all. In rare cases, you lot may be required to overstate existing footings beneath the back up columns as well to handle the additional load. That can get costly!
Know what'due south in the wall. In almost cases, electrical boxes and switches tin can be moved or rerouted relatively easily. But plumbing pipes and heat ducts inside the wall are cause for business organisation. If that'southward the case, contact a plumber and/or heating contractor to discover out exactly what's involved in eliminating or moving pipes or ductwork before you lot start trigger-happy out drywall. Utilize for an electrical permit if you take to move electrical boxes or cables.
Step 2
Cut a Slot in the Ceiling
- Snap a chalk line about 12 inches out from the wall and cutting a slot.
- Strip 1 human foot of ceiling drywall from one side of the wall.
- Pro tip: Use shallow strokes to avoid nicking any electrical cables hidden in the ceiling.

![]()
Step 3
Remove Cables from the Stud Wall
- Examine the ceiling framing to determine the axle blueprint.
- Turn off the electrical power and remove electrical cables, outlets and switches and pull the cable gratis of the studs.
- Cap the ends of the exposed wires with electrical connectors.

Stride iv
Build a Temporary Wall
- Tack a single top 2x4 plate under the flooring joists and some other directly below it to the floor.
- Add a second meridian plate.
- Tap in and toenail temporary studs every two feet.

Total Scope of the Piece of work
DIYers are often surprised by how speedily and easily the beam function went and so how extensive the residue of the task is. That work generally includes drywall patching, respraying textured ceilings, entirely repainting the new room and replacing sections of wood trim. Usually, electrical outlets and switches demand to be repositioned, which calls for rerouting cable and rewiring devices. If the wall contains plumbing pipes or heating vents, a plumber and a heating contractor have to be chosen in. And the finished flooring always has to be replaced. Be sure to consider all of these secondary expenses when computing the price of your project. Nigh of the materials for those items are fairly cheap if you practice the work, just it'south best to go bids ahead of fourth dimension for whatever work you lot plan to hire out.
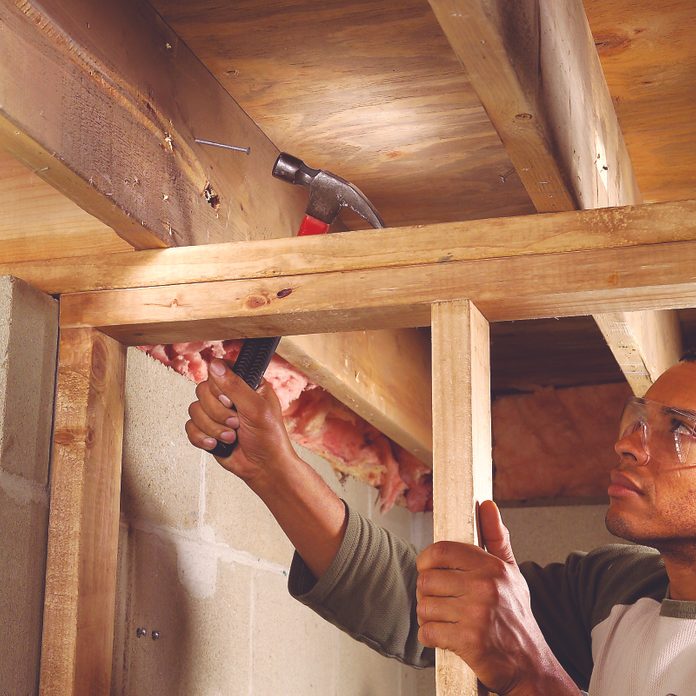
Stride v
Hammer Out the Sometime Studs
- Knock out the bearing wall studs with a sledgehammer.
- Curve over the leftover smash shanks in the lesser plate to protect your feet.

Step half dozen
Cutting Off Nails Sticking Out of the Framing
- Cutting continuous plates and pry them free.
- Cutting off the leftover nail shanks with a reciprocating saw.

Step 7
Remove the Backer Stud
- Cut the nails that hold the capitalist studs and pry them out.
- Annotation: Y'all may have to pry open a gap with your chisel to reach the nails.
- Cut the capitalist stud in one-half to remove it.

Pace 8
Install the Axle Cradle
- Get together ii axle cradles from pairs of 2x4s and screw them to the tie plate and floor with 3-inch screws.

Step 9
Set the Axle in Place
- Cut the beam to length and cut notches (if necessary) to clear tie plates in adjoining walls.
- Skid the beam members into place and rest them on the temporary cradles.

Pace 10
Shim the Beam
- Drive shims between the support studs and the lesser of the beam until the beams is tight confronting the underside of the tie plate.

Pace 11
Install Trimmers Under the Axle Ends
- Cut two snug-fitting trimmers for each end of the beam.
- Tip them into place nether the beam and tap them into place.
- Face or toenail each 1 with at least six 16d nails.

Step 12
Install the Blocking Under the Beam Ends
- Cutting blocking to fit between the floor joists direct under the trimmers at the beam ends.
- Toenail and cease-nail the blocks to the surrounding framing.
Step 13
Boom the Beam and Necktie Plate Together
- Toenail the axle to the necktie plate and to the framing at the ends with 16d nails.
- Smash the beam members together with three 16d nails spaced every 12 inches.

Pace 14
Alternative: Hide the load-begetting beam in the ceiling
- If yous don't similar the appearance of a load-bearing beam, y'all tin hide it with the following steps.
Footstep 15
Construct Two Temporary Walls
- Cut an opening at 21 7/8-inch from either side of the begetting wall (bold it's iv i/ii-inches wide) so yous cease up with a 48-inch opening to patch when you lot're done.
- Add together the temporary walls well-nigh 3 feet. from the bearing wall.
- Tear out the bearing wall.

Step 16
Cut the Joists
- Cut out the joist where the beam will go.
- Pro tip: Exit a little extra infinite so the beam will fit in easily.

Footstep 17
Install the Beam
- Install the beam one LVL at a time.
- Blast the starting time LVL to the joists, so nail the 2d to the start and and so on.
- Spread heavy-duty structure agglutinative between the beams for extra strength.
- Note:If you're installing more than than three LVLs, you lot'll have to boom and bolt them together.

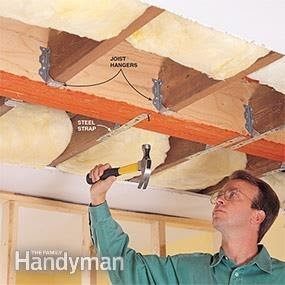
Footstep xviii
Hang the Joists from the Beam
- Nail joist hangers (and metal straps if specified by the engineer) to the beam and each joist.
- Pro tip: Employ joist hangers that are designed to conduct the size of joists you have (there are hangers for 2x6s, 2x8s, etc.). Use nails peculiarly designed for joist hangers.
- Then install 2x4 trimmers inside the walls at both ends of the beam.
Additional Data
- Effigy A: Bearing beam and support details
- Beam pocket at outer wall
- Beam back up at inner wall
- Support blocking in flooring
- Figure B: Overview of Begetting Wall Removal
- Effigy C: Neckband Ties
Originally Published: November 09, 2022

Source: https://www.familyhandyman.com/project/how-to-install-a-loadbearing-beam/
Posted by: alvaradogonell.blogspot.com
0 Response to "How To Install A Load Bearing Wall Beam"
Post a Comment